| ubuntu14.04部署KVM web管理工具 | 您所在的位置:网站首页 › kimchi webvirtmgr › ubuntu14.04部署KVM web管理工具 |
ubuntu14.04部署KVM web管理工具
|
ubuntu14.04部署webvirtmgr
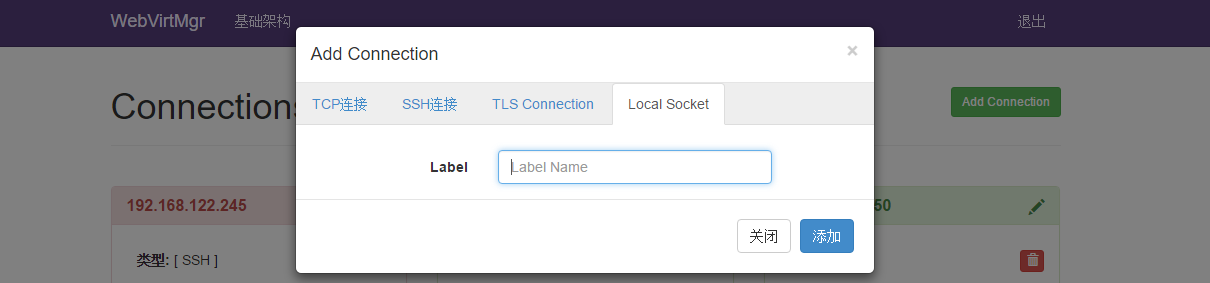
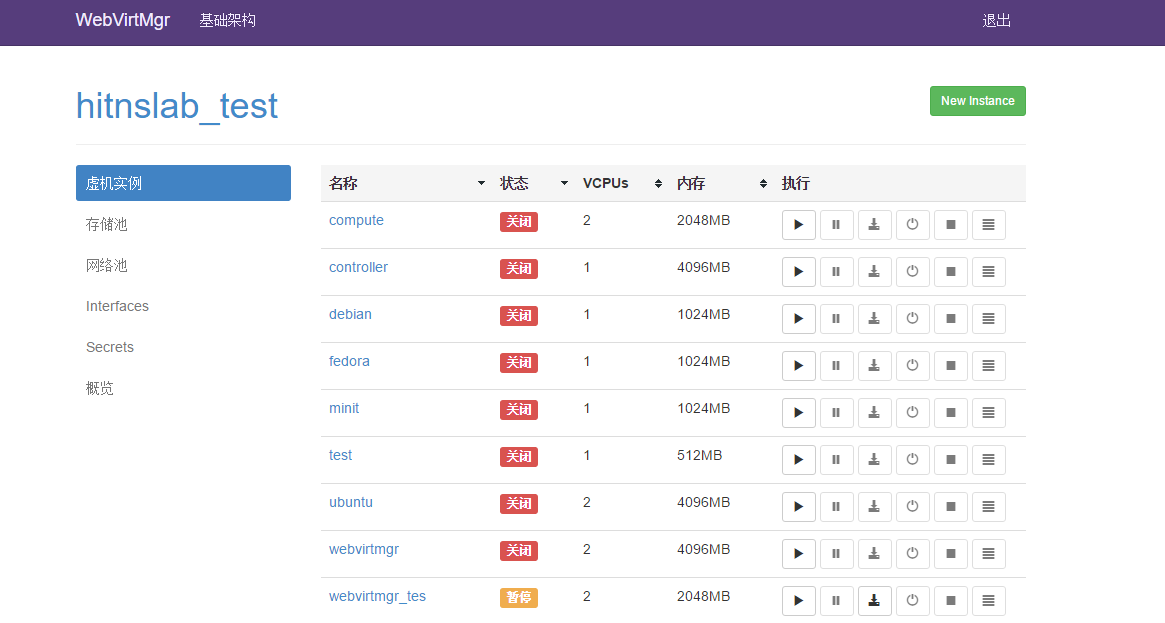
这篇文章主要记录本人在部署webvirtmgr的过程 目录 ubuntu1404部署webvirtmgr 目录 环境检测 查看主机是否有虚拟化支持查看GIT和Python是否安装 设置libvirt和KVM 安装相关包将当前用户添加到libvirtd得用户组里在etcdefaultlibvirt-bin中添加-l的选项在etclibvirtlibvirtdconf 中去掉以下行的注释重启 libvirt创建 saslpassword配置防火墙安装管理环境包 验证安装结果安装 WebvirtMgr 环境包下载webvirtmgr并且设置Django环境设置额外的超级用户 设置 Nginx 注释掉原nginx配置文件中的Server 部分重启nginx服务 设置Supervisor 修改权限新建etcsupervisorconfdwebvirtmgrconf 文件重启服务 验证安装 本机访问1270018000 登陆之前设置的账号添加本地连接 环境检测 查看主机是否有虚拟化支持 $egrep -c ‘(vmx|svm)’ /proc/cpuinfo如果是0说明你的CPU当前不支持虚拟化 创建文件 /etc/ufw/applications.d/libvirtd 然后添加以下内容: [Libvirt] title=Virtualization library description=Open port for libvirt ports=16509/tcp 添加防火墙规则: $ sudo ufw allow from any to any app Libvirt 安装管理环境包: $sudo apt-get install git python-pip python-libvirt python-libxml2 novnc supervisor nginx 验证安装结果: $ virsh -c qemu+tcp://127.0.0.1/system nodeinfo Please enter your authentication name: [username] Please enter your password: [password] #以下是正确的输出 CPU model: x86_64 CPU(s): 24 CPU frequency: 1200 MHz CPU socket(s): 1 Core(s) per socket: 6 Thread(s) per core: 2 NUMA cell(s): 2 Memory size: 65903664 KiB 安装 WebvirtMgr 环境包 $ sudo apt-get install git python-pip python-libvirt python-libxml2 novnc supervisor nginx 下载webvirtmgr并且设置Django环境 $ git clone git://github.com/retspen/webvirtmgr.git $ cd webvirtmgr $ sudo pip install -r requirements.txt $ ./manage.py syncdb $ ./manage.py collectstatic 输入用户信息: You just installed Django's auth system, which means you don't have any superusers defined. Would you like to create one now? (yes/no): yes (Put: yes) Username (Leave blank to use 'admin'): admin (Put: your username or login) E-mail address: [email protected] (Put: your email) Password: xxxxxx (Put: your password) Password (again): xxxxxx (Put: confirm password) Superuser created successfully. 设置额外的超级用户 $ ./manage.py createsuperuser 设置 Nginx$sudo mv webvirtmgr /var/www/ 在 /etc/nginx/conf.d 中添加 nginx的配置文件 webvirtmgr.conf: $sudo vim /etc/nginx/conf.d/webvirtmgr.conf server { listen 80 default_server; server_name $hostname; #access_log /var/log/nginx/webvirtmgr_access_log; location /static/ { root /var/www/webvirtmgr/webvirtmgr; # or /srv instead of /var expires max; } location / { proxy_pass http://127.0.0.1:8000; proxy_set_header X-Real-IP $remote_addr; proxy_set_header X-Forwarded-for $proxy_add_x_forwarded_for; proxy_set_header Host $host:$server_port; proxy_set_header X-Forwarded-Proto $scheme; proxy_connect_timeout 600; proxy_read_timeout 600; proxy_send_timeout 600; client_max_body_size 1024M; # Set higher depending on your needs } } 注释掉原nginx配置文件中的Server 部分:$ sudo vim /etc/nginx/sites-enabled/default # server { # listen 80 default_server; # server_name localhost; # root /usr/share/nginx/html; # # #charset koi8-r; # # #access_log /var/log/nginx/host.access.log main; # # # Load configuration files for the default server block. # include /etc/nginx/default.d/*.conf; # # location / { # } # # # redirect server error pages to the static page /40x.html # # # error_page 404 /404.html; # location = /40x.html { # } # # # redirect server error pages to the static page /50x.html # # # error_page 500 502 503 504 /50x.html; # location = /50x.html { # } # } 重启nginx服务 $ sudo service nginx restart 设置Supervisor 修改权限 $sudo chown -R www-data /var/www/webvirtmgr 新建/etc/supervisor/conf.d/webvirtmgr.conf 文件 [program:webvirtmgr] command=/usr/bin/python /var/www/webvirtmgr/manage.py run_gunicorn -c /var/www/webvirtmgr/conf/gunicorn.conf.py directory=/var/www/webvirtmgr autostart=true autorestart=true stdout_logfile=/var/log/supervisor/webvirtmgr.log redirect_stderr=true user=www-data [program:webvirtmgr-console] command=/usr/bin/python /var/www/webvirtmgr/console/webvirtmgr-console -d directory=/var/www/webvirtmgr autostart=true autorestart=true stdout_logfile=/var/log/supervisor/webvirtmgr-console.log redirect_stderr=true user=www-data 重启服务 $service supervisor restart $service nginx restart#如果在安装nginx之前8000端口被占用了重启会失败,所以需要检查一下 验证安装 本机访问127.0.0.1:8000 登陆之前设置的账号点击 Add Connection 然后选择Local Socket 添加以后就可以看到目前本机虚拟机的详情了 安装到这就结束了,相关的使用方法会在以后的博客中介绍 |
 如果是1及以上说明你的CPU支持虚拟化
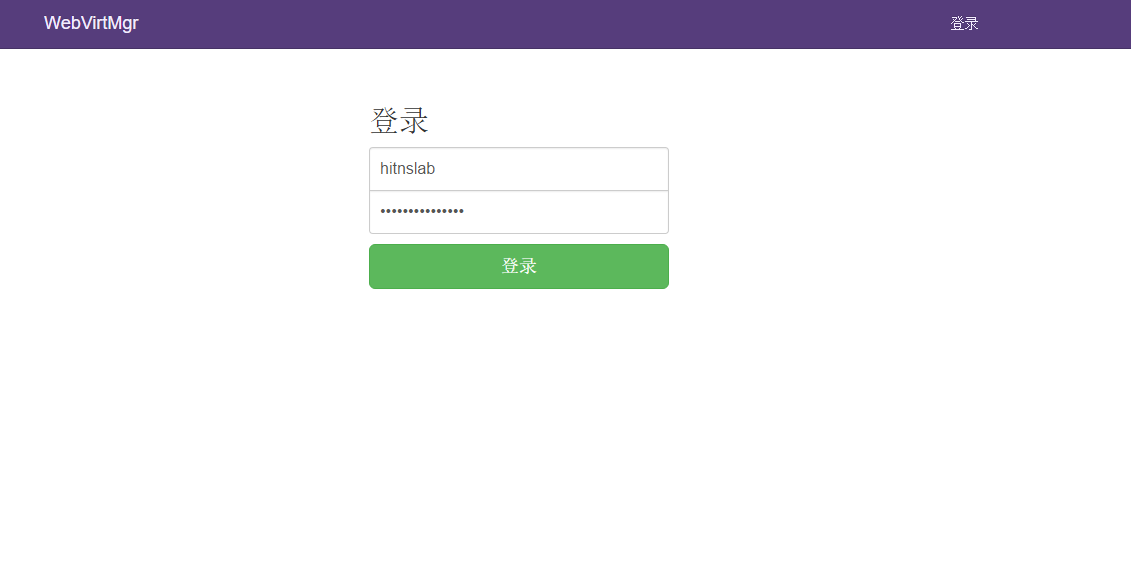
【本文地址】
公司简介
联系我们